After formalizing our concept for a Trick or Treat Vending Machine, Rita and I went ahead with the production.
For the sake of time, we divided the production between the two of us. I would start work on the electronics and vending mechanism, while Rita would start work on creating the enclosure.
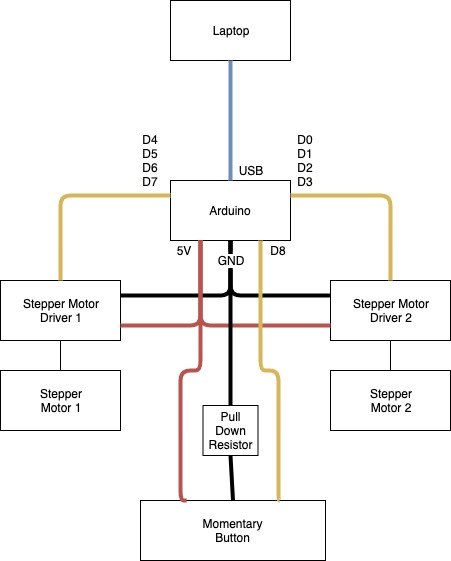
I started work with the circuit. I used the circuit below to create the vending machine. Once I got that working, I went ahead with creating the mechanism for the display. I decided early that the brains of the operations will be the laptop instead of the Arduino, due to the fact that in the laptop, I can run a Javascript runtime, while Arduino uses a modified version of C++. As limited as Javascript is, there is just much more abstraction that can be done there that will make my life easier. I’ve put the code for the display in this repository, and the code for the Arduino can be accessed in this link. After that, I created some videos that will loop over and over in the display and serve as our animation. The videos can be accessed here.

On the other hand, Rita was working on the enclosure. We made the mistake of using cheap wood for this project. A key point that we forgot was that cheap wood tends to morph and distort. This caused some problems for us when creating the box. However, Rita was a champ and she delivered a beautiful box.

Box before painting 
Box after painting
After the two main units are done (enclosure and electronics), we went ahead with the assembly of it. We were expecting problems but things went very well. We manually coiled up a brass rod to serve as our vending machine coil, and it works like a charm. You can see the inside of the machine in the video below.
And this is the final product in action.